
I don’t treat reaching setpoint as proof that trailer insulation is sound. Before loading, I check panels, door seals, moisture, and temperature performance – and hold the trailer for a repair assessment if I find exposed or wet insulation, separated panels, or temperature failure.
My inspection follows three steps:
- Prepare and inspect: Secure, clean, and dry the empty trailer. Lock out the refrigeration unit before checking panels, floors, seams, and door gaskets.
- Check moisture and heat leakage: Use compatible tools, then follow the manufacturer’s controlled refrigeration test. A thermal image alone doesn’t prove insulation damage.
- Document and recheck: Take 3 photos per defect – trailer ID, location, and close-up with a ruler. Arrange approved repairs and verify sealing and temperature performance before loading.
My rule: <u>find the cause, repair it, and confirm the fix before cargo goes in.</u>
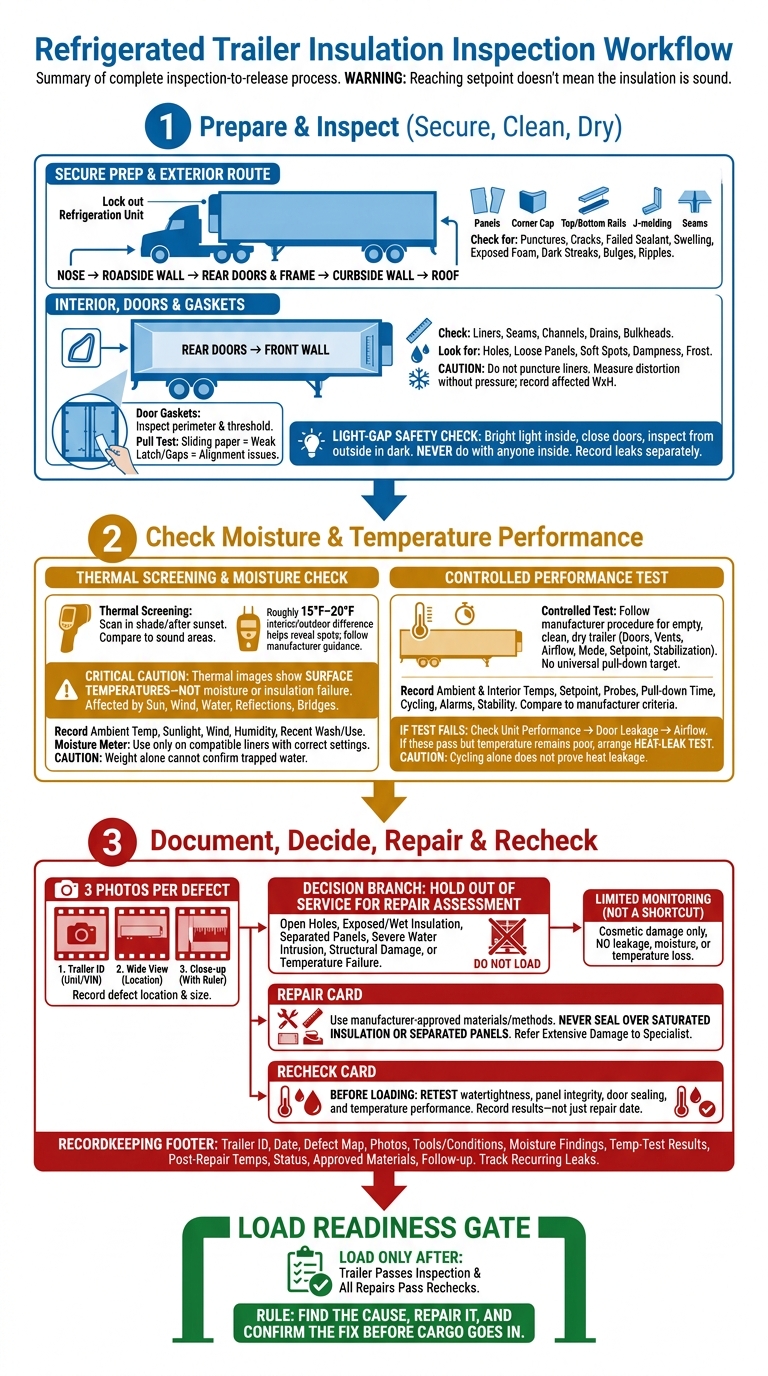
Refrigerated Trailer Insulation Inspection Workflow
Reefer Trailer Foam Repairs
sbb-itb-e2527cf
Step 1: Inspect Panels, Floors, and Door Seals
Start with the trailer shell, then check seals and gaps. Follow the same route each time: nose, roadside wall, rear doors and frame, curbside wall, then roof. Use safe access throughout the inspection.
For each defect, take three photos: the unit number or VIN, a wide view showing the location, and a close-up with a ruler. Record the defect’s location and size, paying close attention to exposed insulation and possible water entry points.
Check Exterior Panels, Roof, and Openings
Inspect panels, corner caps, top and bottom rails, J-molding, and seams for punctures, cracks, and failed sealant. These openings can let water reach the insulation.
Look for swelling, exposed foam, and dark streaks below rivets, which may point to trapped moisture. Bulges or ripples (oil-canning) can signal delamination. From a safe position, check for impact damage, especially near the front and rear headers.
Next, move inside to check whether moisture has reached the insulation.
Check Interior Walls, Ceiling, Floor, and Bulkheads
Work from the rear doors toward the front wall. Check wall and ceiling liners, seams, scuff marks, floor channels, drains, bulkheads, and dividers. Look for holes, loose panels, soft spots, dampness, water marks, and frost. These signs often point to moisture trapped behind the liner.
Do not puncture liners to investigate hidden damage. Use a straightedge to measure distortion without pressing into the panel. Record the affected area’s width and height.
Finish with the rear doors, where seal failure often shows up first.
Check Door Gaskets and Rear-Frame Gaps
Door leaks can reduce insulation performance even when panels look intact. Inspect the full gasket perimeter for tears, brittle rubber, flattened sections, and open corner joints. Check the threshold for debris or damage that keeps the bottom seal from seating.
Perform a paper pull test at several points. If the paper slides out easily, gasket compression is weak. Uneven frame gaps or hard-to-latch cam-locks point to alignment issues, not just gasket wear.
To find light gaps, place a bright light inside the empty trailer, close the doors, and inspect the perimeter from outside in the dark. Never do this with anyone inside the trailer. Record door-seal leaks separately from panel damage so repair staff can identify the right problem.
Step 2: Check Moisture and Temperature Performance
Once you’ve checked for visible damage and seal problems, check how well the trailer keeps out moisture and heat.
Investigate Moisture and Uneven Surface Temperatures
Thermal images show surface temperatures – not moisture or insulation failure. Scan in the shade or after sunset. Compare suspect areas with nearby sound panels under the same conditions. A roughly 15°F–20°F difference between the trailer’s interior and outdoor air can help reveal hot or cold spots. Follow the equipment manufacturer’s guidance.
Record ambient temperature, sunlight, wind, humidity, recent washing, and recent refrigeration use. Sun, wind, and evaporating wash water can skew readings, as can reflections from shiny aluminum. Regular patterns around framing and fasteners may simply be normal thermal bridges.
Use a moisture meter only on compatible liner materials, with settings suited to the panel construction. Empty-trailer weight gain can support a moisture check, but weight alone cannot confirm trapped water.
If surface readings point to a problem, check the trailer’s performance with a controlled test.
Run a Controlled Refrigeration Test
After checking panels and seals, follow the trailer and refrigeration-unit manufacturer’s test procedure. Begin with an empty, clean, dry trailer, and follow the manufacturer’s instructions for doors, vents, and airflow. Use the specified operating mode, setpoint, and stabilization time – not a universal pull-down target.
Record ambient temperature, starting interior temperature, setpoint, probe locations, pull-down time, cycling, alarms, and temperature stability. Compare the results with the manufacturer’s criteria.
If the trailer fails the test, check unit performance, door leakage, and airflow first. If those checks pass but temperature performance is still poor, arrange a professional heat-leak test.
Match Warning Signs to Follow-Up Actions
Cycling alone does not prove heat leakage. Operating mode, weather, and setpoint all affect run time. Treat each signal as a reason to check further, not an automatic pass or fail.
Use the table to choose the next check.
| Inspection signal | Possible cause | Verification method | Urgency |
|---|---|---|---|
| Visible holes or cracks | Impact damage; possible water entry | Inspect inner and outer liners; check for moisture | High – assess before loading |
| Damp insulation | Water ingress or trapped moisture | Trace the entry path; check with a compatible moisture meter | High – prompt repair assessment |
| Uneven thermal pattern | Insulation defect, reflection, or thermal bridge | Repeat under controlled conditions; compare adjacent panels and physical findings | Investigate; escalate if other findings support the concern |
| Light at door seals | Poor gasket compression or frame gap | Place a light inside; inspect seals from outside with nobody inside | High – address leakage before loading |
| Unexplained empty-weight gain | Possible moisture retention | Compare scale records under equivalent empty-trailer conditions | Investigate; weight alone is inconclusive |
| Excessive refrigeration cycling | Heat gain, unit fault, or operating mode | Review mode and weather; test the unit, seals, and airflow | Prompt diagnosis; escalate if temperatures stay out of spec. |
Step 3: Document Damage and Arrange Repairs
Decide When to Hold the Trailer
If the inspection finds damage, moisture, or temperature loss, decide whether the trailer can stay in service.
Hold the trailer out of service for a repair assessment if you find open holes, exposed or wet insulation, separated panels, severe water intrusion, structural damage, or temperature failure. Don’t load it again until repairs restore insulation and temperature performance.
Monitoring alone is appropriate only for cosmetic damage with no leakage, moisture, or temperature loss. For repairable damage, use approved materials and retest after the work is complete.
Use Approved Repairs and Recheck Performance
Use manufacturer-approved materials and methods for minor repairs. Never seal over saturated insulation or separated panels. Refer saturated insulation, extensive delamination, major panel damage, and structural concerns to a refrigerated-trailer repair specialist.
Before loading, retest watertightness, panel integrity, door sealing, and temperature performance. Record the results – not just the repair date.
Keep an Inspection Record for Each Trailer
Once you’ve made the repair decision, update the trailer’s record so you can track the issue at the next inspection.
Record the trailer ID, inspection date, temperatures measured during the post-repair check, tools used, and test conditions. Map each defect’s location and dimensions. Attach photos showing both the damage and the surrounding area.
Include moisture findings, temperature-test results, repair status, approved materials used, and a follow-up date. Track repeat leaks at the same seams, corners, or door frames. Use a consistent record format to help spot recurring leaks and schedule repairs between loads.
Conclusion: Confirm Readiness Before Loading
Reaching setpoint doesn’t mean the insulation is sound. Temperature alone isn’t enough.
Check panels, seals, moisture, and temperature performance. Make sure you’ve inspected every insulation zone and fixed any moisture intrusion or hot spots. Document your findings, and load only after the trailer passes inspection and all repairs pass rechecks.
FAQs
How often should I inspect refrigerated trailer insulation?
Check your refrigerated trailer’s insulation and seals during every daily pre-trip walk-around, before loading. Look for cuts, punctures, worn door gaskets, and other damage inside or outside the trailer. Address any damage immediately.
Even small openings can let moisture into the foam insulation, reducing its ability to hold temperature. Daily checks help keep the thermal barrier intact, prevent cargo loss, and limit the extra fuel use caused by temperature leaks.
How can I detect hidden insulation damage?
Check the trailer’s exterior panels, interior linings, and subfloor liner for cuts, punctures, or wear. Pay extra attention to the roof: hidden damage can let water seep into the insulation.
Inside, check walls and floors for soft spots or condensation – signs that moisture has entered. Water leaking from anywhere other than the designated floor drains suggests it’s trapped in the insulation foam.
When does damaged insulation need replacement?
Replace damaged insulation immediately to maintain temperature control and prevent cold air loss [1]. Repair cuts, punctures, or tears in exterior panels, interior linings, or the subfloor liner as soon as you find them [1].
Watch for soft spots on walls or floors, along with condensation that may indicate moisture in the foam. These signs point to damaged insulation that needs attention. Putting off repairs can sharply reduce cold air retention [1].
Related Blog Posts
About Booker Transportation
Booker Trans is 100% Owner Operator. It is our belief that an Independent Owner is the best way to get a customers freight delivered timely and safely. Booker is a leading Refrigerated Carrier providing the best lease options in the industry for today’s Owner Operators. Monthly and Yearly Awards, Longevity Bonuses, and the Free tires for Life of Lease Program, are just a few examples of what Booker Trans offers the Owner Operator. Booker Trans has built it’s success upon working partnerships with Customers, as well as Agency Relationships built over the last 20 years. Those same relationships are what makes consistent year round freight possible.
Are you interested in becoming an owner operator driver or getting into the logistics industry?
Let’s connect!
How to Inspect Refrigerated Trailer Insulation
10/26/2026

IFTA Fuel Tax Basics for Owner-Operators
10/19/2026
